I am recently working on a CLI tool to manage and distribute CTF problems. While I was implementing the remove repository operation, I got an unexpected Access is denied. (os error 5) message on stable-x86_64-pc-windows-msvc toolchain (Rust 1.31.1).

fs::remove_dir_all(...) in this code was emitting the error.

let mut repo_index = env.data_dir().read_repo_index()?;

let image_list = runtime.block_on(docker::list_images(env))?;
if docker::image_from_repo_exists(&image_list, repo_name) {
    Err(SomaError::RepositoryInUseError)?;
}

let repository = repo_index
    .remove(repo_name)
    .ok_or(SomaError::RepositoryNotFoundError)?;
env.data_dir().write_repo_index(repo_index)?;

remove_dir_all(repository.local_path())?;

env.printer().write_line(&format!(
    "Successfully removed repository: '{}'.",
    &repo_name
));

Ok(())

I first ensured that no program is using files inside the directory. Then, I started searching about the issue. Surprisingly, it was a long-standing issue in the standard library from 2015 (#29497).

According to @pitdicker’s comment, problems with the current remove_dir_all implementation on Windows are:

  • cannot remove contents if the path becomes longer than MAX_PATH
  • files may not be deleted immediately, causing remove_dir to fail
  • unable to remove read-only files

Mine was the third case. .git/objects/pack contained files with read-only attributes, which caused the denial of the access. This behavior was surprising because I had no problem deleting the directory with File Explorer or on Linux. Apparently, this is the default behavior of Windows API, and Python had a similar issue. I agree to Tim Golden’s comment which says that “this, unfortunately, is the classic edge-case where intra-platform consistency and inter-platform consistency clash,” but I hope to have an easy fix in Rust like Python’s onerror argument instead of manually writing a directory recursion with permission handling.

The second problem is also noteworthy. The core reason for it is that unlike POSIX API, Windows file deletion API does not delete the file immediately but mark it for “delete later.” Therefore, even though DeleteFile call returns, it is not guaranteed that the file is actually deleted from the file system. Racing the File System talk in CppCon2015 mentions how to wrongly delete a directory tree on Windows. Unfortunately, this is the way how Rust’s remove_dir_all is implemented.

Slide from “Racing the File System”

As a result, the issue is causing spurious failures in rustup (#995). Also, tempdir and Maskerad implemented their version of remove_dir_all to bypass this problem. There was a PR (#31944) to fix this problem, but it was not merged to the upstream because of the difficulty of defining reasonable cross-platform behavior for Windows and Linux, the complexity of permission handling, and the inactivity from the original author.

The best solution, for now, seems using remove_dir_all crate which is based on PR #31944. I understand that it is hard to define the reasonable behavior for this kind of operations especially for cross-platform projects, but at least I could have saved much time if these edge cases were listed in the official documentation.

레주메는 보통 MS Word 등의 워드프로세서나 LaTeX로 작성하는 것이 일반적입니다. 하지만 둘 모두 문서 작성에 초점이 맞춰져 상호작용 기능이 부족했고, 여기에 제 힙스터 기질이 더해져 웹 기반 레주메를 만들어보자는 생각이 들었습니다. 그래서 구글의 머티리얼 디자인을 채용해 웹 기반 레주메를 만들었었습니다. CSS 전처리기로는 Less를 사용했고, Font Awesome 아이콘도 활용해 각 프로젝트의 GitHub 페이지 링크를 걸고, 아이콘을 누르면 프로젝트 스크린샷을 보여주는 기능 등을 넣었습니다.

그런데…

여기까지 작업은 작년에 마치고, 학교 후원 인턴 프로그램인 SES에 지원할 때 사용했습니다. 별도로 문서 파일로 된 버전이 없었기 때문에 이력서 제출할 때는 연락처와 레주메 링크를 txt 파일로 저장하고 이 txt 파일을 제출했습니다. 지금 생각해보면 정말 패기있는 결정이었네요. 제가 지원했던 회사는 졸업 예정 학생만 뽑는다고 해서 결국 인턴십은 하지 않았지만 그래도 연락이 온 걸 보면 썩 나쁘지는 않았나 봅니다.

…라고 착각하고 있었습니다. 내년 1학기 인턴을 준비중이라 업데이트를 위해 GitHub에 들어갔더니 예전에 만들어 놓은 레주메에 고칠 점이 너무 많이 보였습니다. 1년 학교를 더 다니는 동안 성장한 증거라고 생각하고 있습니다. 큰 문제점은 두 가지였습니다.

  1. 지나치게 많은 정보를 담고 있었습니다. 지원하는 회사는 수많은 지원서를 봐야 하는데, 작은 취미 프로젝트들까지 전부 써 놓았더니 지원서가 너무 길어 보였습니다. 레주메 보다는 포트폴리오에 가까운 구성이었습니다.
  2. 파일로 존재하는 실체가 없었습니다. 레주메 링크를 txt로 첨부하는 것은 상황에 따라 무례해 보일 수도 있고, 추가 접속을 필요로 한다는 점에서 좋은 UX가 아니었습니다.

그래서 기존에 만들어 놓은 웹 기반 레주메의 내용을 다듬으며, 브라우저에서 보이는 웹 문서 파일 뿐 아니라 PDF 출력 파일까지 같은 소스코드에서 뽑는 것을 목표로 리팩토링을 시작했습니다.

서론이 길었네요. 그래서 이번 게시글에서는 기존 포트폴리오 스타일 레주메를 리팩토링하면서 어떤 내용과 디자인을 다듬는데 주력했는지, 그리고 웹 기반 PDF 문서 파일을 만들 때 사용한 CSS 기술 소개와, 화면 기반 컨텐츠와 어떤 차별점을 두었는지를 공유해보려고 합니다.

내용 다듬기


리팩토링 전 레주메 페이지와 프린트 미리보기입니다. 장황하고, 한 눈에 잘 안 들어오고, 두서가 없습니다. 프린트 미리보기에서는 페이지가 잘려 있는 모습도 확인할 수 있습니다. 또 하나의 문제점은 오래된 내용을 위쪽에 배치하고, 새로운 내용을 아래쪽에 배치한 것입니다. 기존 구성은 Education과 Works 두 파트로 나뉘어 Education에서는 학업 진행상황과 관련 연구 및 프로젝트를 혼합해 서술했고, Works 문단에서는 수상 내역과 진행한 프로젝트를 혼합해 서술했습니다.

이러한 구성이 전체적인 내용 파악을 어렵게 한다고 생각되어 새로운 레주메 페이지는 Education, Researches and Projects, Awards의 세 부분으로 나누고 최근 진행한 프로젝트가 위쪽에 오도록 내용을 다듬으며, 각 프로젝트에 대한 설명을 핵심만 짧게 포함하도록 다듬었습니다. 또한, 페이지 마지막에 최종 수정 날짜를 추가해 얼마나 최신 변경사항까지 다루고 있는지를 표기했습니다.

디자인 다듬기

폰트 사이즈 축소

기존에는 구글의 머티리얼 디자인 타이포그라피 가이드를 최대한 지키려고 노력하며 작업했습니다. 폰트 사이즈와 줄 간격 등을 개발자 도구로 뽑아서 그 값을 그대로 사용하려고 했습니다. 하지만 해당 가이드는 앱이나 웹 가독성에 최적화 되어 있었고, 레주메에 사용하기에는 줄 간격 등의 여백이 조금 넓어 보였습니다. 그래서 이번 리팩토링에서 머티리얼 디자인의 느낌은 유지하면서, 전체적으로 여백과 폰트 사이즈를 조금씩 줄였습니다.

Chip 삭제

기존 디자인은 머티리얼 디자인의 chip을 사용해 다양한 정보를 표시했습니다.

하지만 내용 리팩토링을 하면서 연구나 프로젝트를 제외한 소규모 취미 프로젝트들 관련 내용을 대부분 삭제했기 때문에 chip을 사용할만한 자리가 많이 남지 않았고, 어설프게 사용할 경우 실제 중요한 내용보다 chip에 시선이 머무르는 것처럼 느껴져 대부분의 chip을 삭제했습니다.

페이지 우측 공간 활용

위쪽 스크린샷에서 확인하시는 바와 같이, 기존 디자인에서는 프로젝트 제목 바로 옆에 GitHub 링크나 소개 스크린샷, 사용 기술 등의 정보가 포함되어 있었습니다. 새로운 디자인에서는 연도 정보를 제외한 다른 추가 정보들을 float: right CSS를 활용해 페이지 우측으로 옮겼고, 시선을 덜 차지하도록 변경했습니다. 아래는 변경된 디자인입니다.

여기까지 변경 사항을 적용해 레주메 웹 페이지는 다음과 같이 변했습니다. 이제 PDF 페이지를 디자인할 차례입니다.

문서 파일로 내보내도 예쁜 웹페이지 만들기

웹페이지를 인쇄할 때 PDF 내보내기 옵션을 사용하면 PDF 파일로 출력이 가능합니다. 하지만 별도로 신경써서 만들지 않는 경우 세로로 무한히 스크롤이 가능한 웹 페이지와, 페이지 단위로 내용이 잘리는 문서 파일의 차이로 인해 그렇게 예쁜 레이아웃이 나오지는 않습니다. 여기서 CSS의 기능을 활용하면 문서 파일에서도 예뻐 보이는 페이지를 디자인할 수 있습니다. 제가 사용한 CSS 기능은 두 가지입니다. 첫 번째는 CSS의 media 쿼리, 두 번째는 page-break-before 스타일입니다. 각 요소에 대한 자세한 설명은 MDN의 미디어 쿼리 페이지와 page-break-before 페이지를 참고하시고, 이 포스트에서는 간단한 사용법만 다룰 예정입니다.

  • CSS 미디어 쿼리는 어떤 미디어에서 보고 있냐에 따라 다른 CSS를 적용할 수 있게 해 줍니다. @media screen {} 내부에 정의한 내용은 화면으로 볼 때만 적용되며, @media print {} 내부에 정의한 내용은 프린트 할 때만 적용됩니다. 화면 크기 등의 제한 조건을 넣어 반응형 웹사이트를 만들 때에도 CSS 미디어 쿼리가 사용됩니다.
  • page-break-before은 문서를 프린트할 때 HTML 요소 앞에서 페이지가 어떻게 넘겨질지를 결정합니다. always로 설정할 경우 Word 등에서 Ctrl+Enter로 페이지를 넘기는 것처럼 페이지가 인쇄되도록 할 수 있습니다.

이 두 가지 기능을 활용해 웹 기반 레주메 페이지를 문서 파일로 볼 때에도 예쁜 디자인을 유지하도록 추가 작업에 들어갔습니다.

  1. 문서 파일 처음에 있는 마진을 제거했습니다. 웹 페이지에서는 머티리얼 디자인의 특징인 ‘실제 종이를 들고 읽는 듯한 느낌’을 중시했기에 페이지 상단에 배경이 보이도록 여백을 넣었습니다. 문서 파일에서는 페이지 상단에 어색한 공백을 만들기 때문에 이를 제거했습니다.
  2. 동작하지 않는 인터랙션 기능을 제거했습니다. 웹 페이지에서 해당 아이콘을 클릭하는 경우 라이트박스를 이용해 스크린샷과 영상 자료 등을 띄워주도록 구성되어 있습니다. PDF 파일 내에 링크는 넣을 수 있기 때문에 GitHub 링크는 남기고, JavaScript가 필요한 버튼들은 제거합니다.
  3. 1번과 마찬가지 이유로 머티리얼 디자인의 그림자는 제거했습니다.
  4. 문서 파일에서는 페이지 개념이 있는 관계로, 적절한 곳에 page-break를 삽입합니다. 페이지가 나뉘는 경우 page-break-before 전에 프린트 미디어에서만 보이는 hr 태그를 하나 더 삽입해 문서의 각 섹션이 하나의 페이지 안에 담기도록 합니다.
  5. 웹 페이지에서는 hr 태그가 가로를 전부 채우지만, 실제 문서 파일에서는 문서 양쪽에 공백을 두는 것이 일반적이므로 추가 패딩을 적용합니다.
  6. 최종 수정 날짜 옆에 온라인 레주메 링크를 삽입합니다. 이를 통해 예전 버전의 문서 파일을 가지고 있을 때 최신 버전의 레주메를 쉽게 찾을 수 있습니다.

이렇게 완성된 레주메는 제 GitHub Page에서 확인하실 수 있습니다. 출력 파일은 Letter, 여백 없음을 기준으로 작업했으니 PDF 버전도 Ctrl + P로 확인해보세요!

이 글은 예전 버전 certbot을 기준으로 작성되었습니다. certbot이 업데이트 되면서 nginx 플러그인이 베타를 벗어나 자동 설정이 가능하게 되었습니다. 자세한 정보는 certbot 홈페이지를 참고해주세요.

블로그에 HTTPS 붙여야지 붙여야지 계속 말만 하면서 안 붙이고 있었는데, 연휴를 맞아 실행하게 되었습니다. 이 글은 NGINX 위에서 직접 호스팅하는 WordPress 블로그에 Let’s Encrypt 인증서를 적용하는 튜토리얼입니다.

1. Certbot으로 인증서 받아오기

Let’s Encrypt는 인증 기관(Certificate Authority, CA) 중 하나입니다. Self-signed 인증서를 이용해 HTTPS를 구현할 수도 있습니다만 HTTPS를 제대로 지원하려면 인증 기관에서 발급 받은 인증서가 필요합니다. 대부분의 인증 기관이 인증서를 유료로 발급해주는데 반해, Let’s Encrypt는 무료로 갱신 가능한 90일짜리 인증서를 발급해준다는 장점이 있습니다. Let’s Encrypt는 인증서를 발급할 때 ACME 프로토콜을 사용하는데, Certbot은 다양한 ACME 클라이언트 중 Let’s Encrypt에서 공식적으로 추천하는 클라이언트입니다.

먼저 Certbot을 설치하고 디펜던시 설치를 위해 설치 후 한 번 실행해 줍시다(루트 권한이 필요합니다). 글 작성일을 기준으로 아직 NGINX auto-config 기능이 기본 클라이언트에 포함되어 있지 않기 때문에 실행 결과 마지막에 관련된 에러 메시지가 뜰텐데, 큰 문제가 아니니 걱정하지 않으셔도 됩니다.

$ cd /usr/local/sbin
$ sudo wget https://dl.eff.org/certbot-auto
$ sudo chmod a+x certbot-auto
$ certbot-auto

다음 단계는 설치된 Certbot으로 인증서를 받아오는 것입니다. Certbot은 플러그인 방식으로 동작하며, $ certbot-auto [SUBCOMMAND] --{plugin name}처럼 실행하면 해당 플러그인 모드로 실행됩니다. WordPress 블로그의 경우 보통 정적 파일 serving이 세팅되어 있기 때문에, webroot 플러그인을 사용하는 것을 추천드립니다. 다른 플러그인을 사용하는 경우 여기를 참고하시면 됩니다.

webroot 플러그인은 certonly 모드로 동작시켜야 합니다. -w 옵션 뒤에는 Top-level 디렉토리(WordPress 설치 경로)를 넣고, -d 옵션 뒤에 Host 주소를 넣으면 됩니다. 제 경우에는 qwaz.io, blog.qwaz.io에 적용되는 인증서를 얻기 위해 $ certbot-auto certonly --webroot -w /home/qwaz/blog/www -d qwaz.io -d blog.qwaz.io 명령을 실행했습니다.

webroot 플러그인은 Top-level 디렉토리에 .well-known/acme-challene/{HASH} 파일을 자동으로 생성해 해당 서버에 대한 소유 권한을 확인합니다. 인증 후에는 자동으로 삭제까지 이루어집니다. 프롬프트에 이메일 주소를 입력하고 약관에 동의하면 verification이 이루어지고, /etc/letsencrypt/live/{domain}/에 인증서가 저장됩니다. 또한, 이후 renewal을 위한 계정 정보 등도 /etc/letsencrypt에 함께 저장되며 주기적인 백업을 추천하는 안내 메시지를 보실 수 있습니다.

인증서 디렉토리에 가서 확인하시면 cert.pem, chain.pem, fullchain.pem, privkey.pem 총 네 가지 파일이 생성된 것을 확인하실 수 있을 겁니다. 마지막으로, $ openssl dhparam -out dhparam.pem 2048 명령어를 이용해 디피-헬만 그룹을 생성해 저장합니다. 시간이 좀 걸리니 천천히 기다리셔야 합니다.

인증서 갱신은 $ cerbot-auto renew 명령으로 가능하며, 인증서 유효기간이 90일인 것을 염두에 두고 주기적으로 실행하시면 됩니다. crontab 등의 유틸리티를 이용해 자동 갱신을 설정하실 수도 있습니다.

2. NGINX에 HTTPS 적용하기

/etc/nginx/sites-enabled 디렉토리에서 HTTPS를 지원하도록 서버 설정을 바꾸어 주어야 합니다. HTTPS를 적용하기 이전 제 블로그 conf 파일은 다음과 같습니다.

# configuration of the server
server {
        # the port your site will be served on
        listen 80;

        # the domain name it will serve for
        server_name     blog.qwaz.io;
        charset         utf-8;

        root /home/qwaz/blog/www;
        index index.php;

        location = /favicon.ico {
                log_not_found off;
                access_log off;
        }

        location = /robots.txt {
                allow all;
                log_not_found off;
                access_log off;
        }

        access_log      /home/qwaz/blog/log/access.log;
        error_log       /home/qwaz/blog/log/error.log;

        client_max_body_size 10M;

        location / {
                try_files $uri $uri/ /index.php?$args;
        }

        location ~ \.php$ {
                include fastcgi.conf;
                fastcgi_intercept_errors on;
                fastcgi_pass unix:/var/run/php5-fpm.sock;
        }

        location ~* \.(js|css|png|jpg|jpeg|gif|ico)$ {
                expires max;
                log_not_found off;
        }
}

Mozilla SSL Configuration Generator의 설정 파일을 기본으로 다음과 같이 수정했습니다. NGINX은 1.10.2 버전, OpenSSL은 1.0.1f 버전을 사용중입니다. NGINX 버전 확인은 $ nginx -v, OpenSSL 버전 확인은 $ openssl version명령을 사용하시면 됩니다.

server {
    listen 80;
    listen [::]:80;

    server_name     blog.qwaz.io;

    # Redirect all HTTP requests to HTTPS with a 301 Moved Permanently response.
    return 301 https://$host$request_uri;
}

server {
    listen 443 ssl http2;
    listen [::]:443 ssl http2;

    # the domain name it will serve for
    server_name     blog.qwaz.io;
    charset         utf-8;

    # certs sent to the client in SERVER HELLO are concatenated in ssl_certificate
    ssl_certificate /etc/letsencrypt/live/qwaz.io/fullchain.pem;
    ssl_certificate_key /etc/letsencrypt/live/qwaz.io/privkey.pem;
    ssl_session_timeout 1d;
    ssl_session_cache shared:SSL:50m;
    ssl_session_tickets off;

    # Diffie-Hellman parameter for DHE ciphersuites, recommended 2048 bits
    ssl_dhparam /etc/letsencrypt/live/qwaz.io/dhparam.pem;

    # intermediate configuration. tweak to your needs.
    ssl_protocols TLSv1 TLSv1.1 TLSv1.2;
    ssl_ciphers 'ECDHE-ECDSA-CHACHA20-POLY1305:ECDHE-RSA-CHACHA20-POLY1305:ECDHE-ECDSA-AES128-GCM-SHA256:ECDHE-RSA-AES128-GCM-SHA256:ECDHE-ECDSA-AES256-GCM-SHA384:ECDHE-RSA-AES256-GCM-SHA384:DHE-RSA-AES128-GCM-SHA256:DHE-RSA-AES256-GCM-SHA384:ECDHE-ECDSA-AES128-SHA256:ECDHE-RSA-AES128-SHA256:ECDHE-ECDSA-AES128-SHA:ECDHE-RSA-AES256-SHA384:ECDHE-RSA-AES128-SHA:ECDHE-ECDSA-AES256-SHA384:ECDHE-ECDSA-AES256-SHA:ECDHE-RSA-AES256-SHA:DHE-RSA-AES128-SHA256:DHE-RSA-AES128-SHA:DHE-RSA-AES256-SHA256:DHE-RSA-AES256-SHA:ECDHE-ECDSA-DES-CBC3-SHA:ECDHE-RSA-DES-CBC3-SHA:EDH-RSA-DES-CBC3-SHA:AES128-GCM-SHA256:AES256-GCM-SHA384:AES128-SHA256:AES256-SHA256:AES128-SHA:AES256-SHA:DES-CBC3-SHA:!DSS';
    ssl_prefer_server_ciphers on;

    # HSTS (ngx_http_headers_module is required) (15768000 seconds = 6 months)
    add_header Strict-Transport-Security max-age=15768000;

    # OCSP Stapling ---
    # fetch OCSP records from URL in ssl_certificate and cache them
    ssl_stapling on;
    ssl_stapling_verify on;

    ## verify chain of trust of OCSP response using Root CA and Intermediate certs
    ssl_trusted_certificate /etc/letsencrypt/live/qwaz.io/chain.pem;

    resolver 8.8.8.8 8.8.4.4 valid=86400;
    resolver_timeout 5s;

    root /home/qwaz/blog/www;
    index index.php;

    location = /favicon.ico {
        log_not_found off;
        access_log off;
    }

    location = /robots.txt {
        allow all;
        log_not_found off;
        access_log off;
    }

    access_log      /home/qwaz/blog/log/access.log;
    error_log       /home/qwaz/blog/log/error.log;

    client_max_body_size 10M;

    location / {
        try_files $uri $uri/ /index.php?$args;
    }

    location ~ \.php$ {
        include fastcgi.conf;
        fastcgi_intercept_errors on;
        fastcgi_pass unix:/var/run/php5-fpm.sock;
    }

    location ~* \.(js|css|png|jpg|jpeg|gif|ico)$ {
        expires max;
        log_not_found off;
    }
}

conf 파일을 저장한 후, $ sudo service nginx restart로 NGINX를 재시작합니다. 설정 파일을 검증하려면 $ nginx -t를 이용해 문제가 있는지 확인하실 수 있습니다.

3. WordPress 설정 변경

이제 http로 접속을 시도하는 경우 https로 리디렉팅 되는 것을 확인하실 수 있을 겁니다. 사소한 남은 변경사항들을 적용합시다.

  1. WordPress의 설정 > 일반에서 WordPress 주소와 사이트 주소를 http에서 https로 변경합니다.
    https 설정 페이지
  2. 기존 글에 있던 http 링크들을 https로 업데이트 합니다. 저는 Velvet Blues Update URLs라는 플러그인을 이용했습니다.
    velvet blues update urls capture

이제 블로그에 들어가시면 기분 좋은 자물쇠 마크를 확인하실 수 있습니다!

참고한 링크

Let’s Encrypt – Getting Started
Certbot HowTo
Outsider’s Dev Story
Digital Ocean 튜토리얼

OpenCV와 Android Studio 버전에 따라 다른 내용이 생길 수 있으니 주의 바랍니다.

1. 안드로이드 SDK 다운로드

OpenCV 다운로드 페이지에서 OpenCV for Android를 다운 받습니다. 다운 받은 파일을 원하는 위치에 압축 해제합니다. 저는 편리한 접근을 위해 C 드라이브에 바로 압축해제 했습니다.

2. 프로젝트 생성

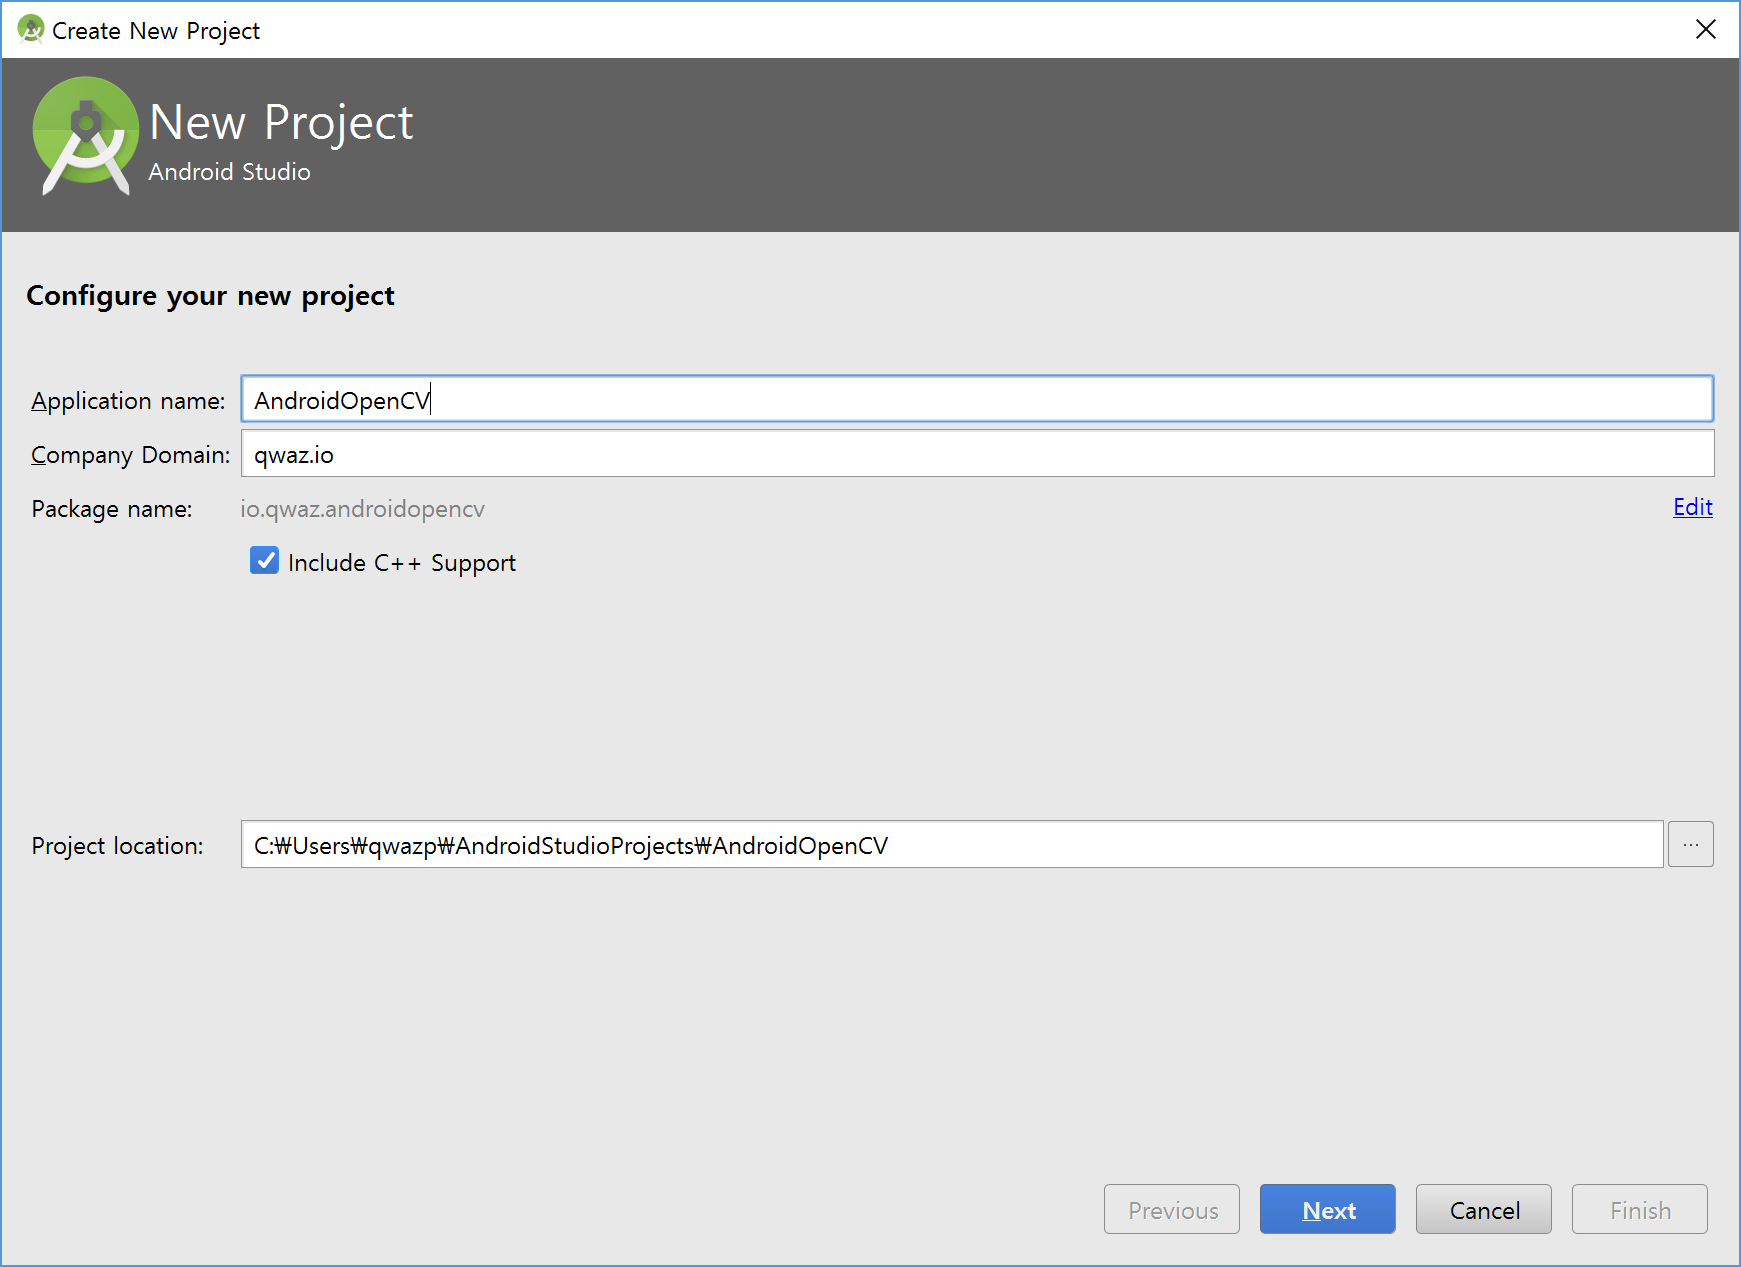
새롭게 프로젝트를 생성합니다. 안드로이드에서 OpenCV를 사용할 때는 OpenCV JAVA API를 사용할 수도 있고, OpenCV Native API를 JNI 형태로 사용할 수도 있습니다. 후자가 지원하는 기능이 더 많지만 추가로 설정이 필요합니다. 이 문서에서는 JNI를 사용하는 부분까지 전부 다룰 예정이지만 JAVA API 부분만 사용할 예정이라면 C++ 지원은 해제하셔도 됩니다.

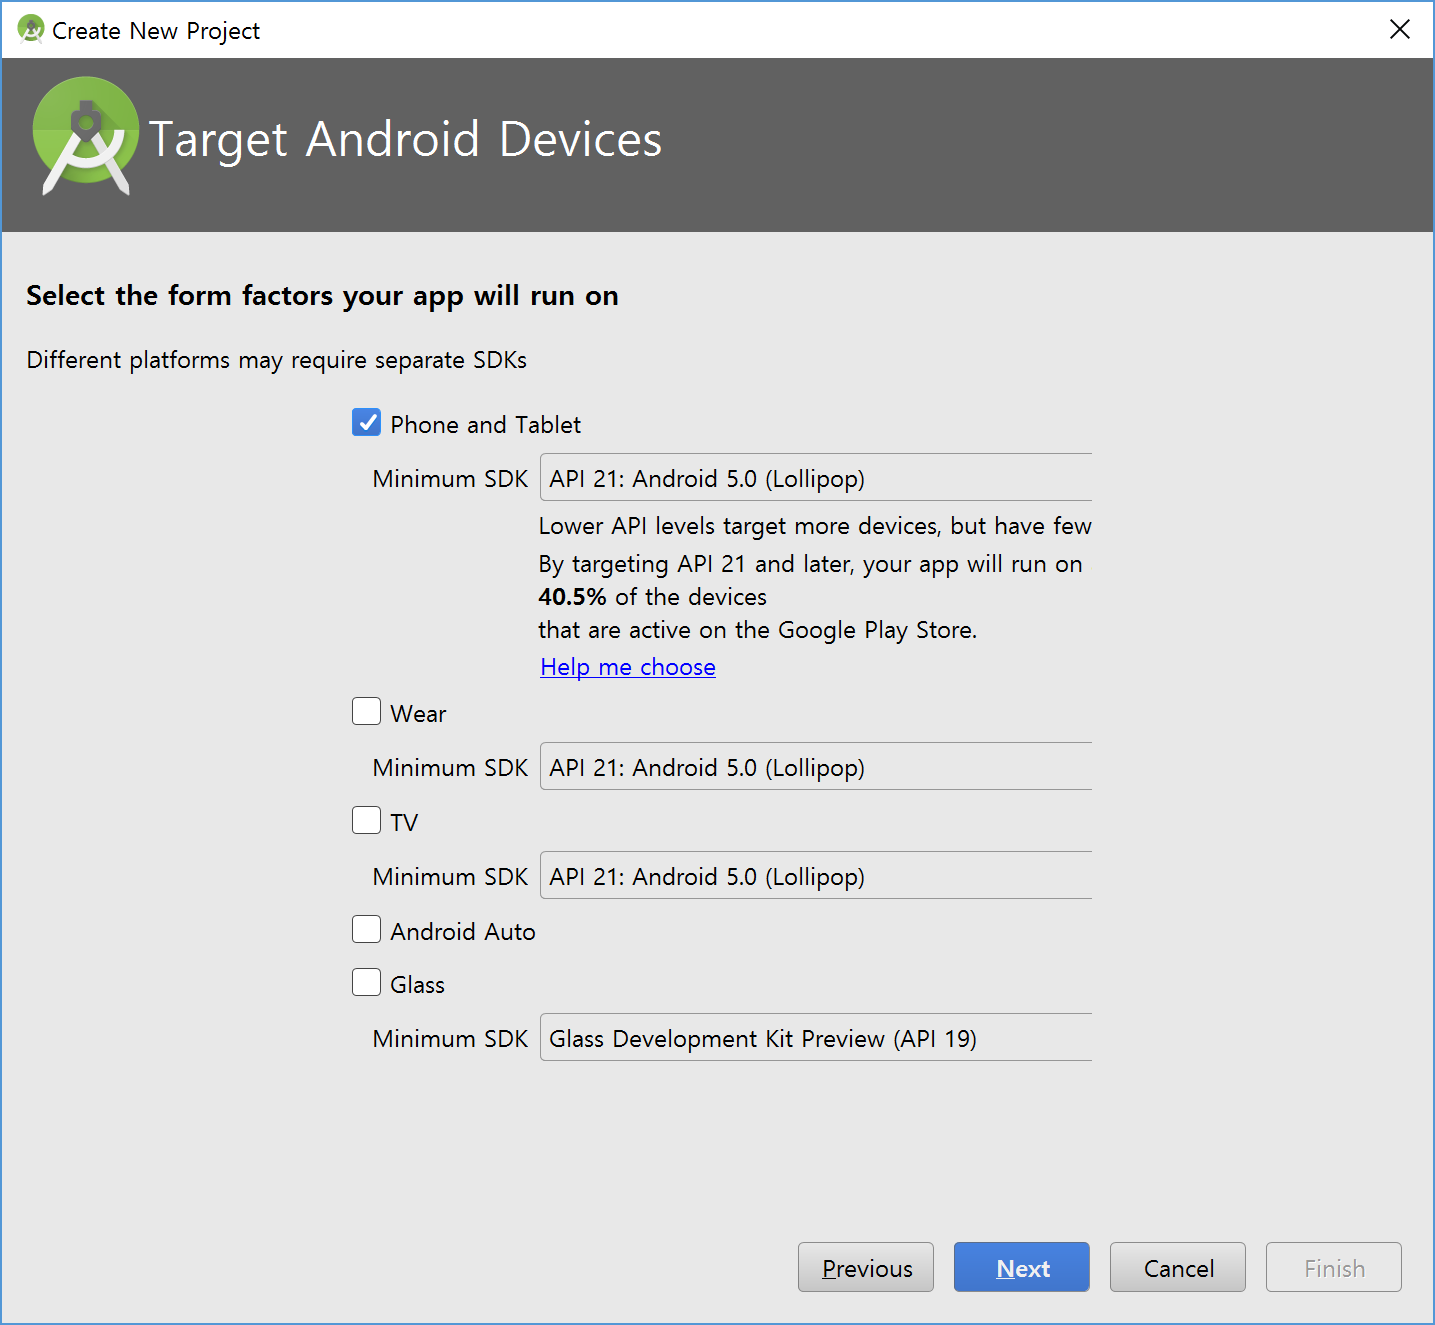
다음으로 최소 SDK 버전 설정 페이지가 나오는데, API 21 이상으로 설정합니다. OpenCV 3.1 버전에서는 안드로이드의 camera2 클래스를 사용하기 때문에 최소 SDK 버전을 21 이상으로 맞출 필요가 있습니다. 이후는 기존의 안드로이드 프로젝트 생성과 동일합니다. Empty Activity를 선택했고, C++11 지원을 켠 것 이외에는 모두 기본 설정으로 진행했습니다.

CMake, NDK 등 JNI 사용에 필요한 도구들이 설치되어 있지 않아 에러 메시지가 발생하는 경우 Tools > Android > SDK Manager의 SDK Tools 탭에서 설치할 수 있습니다. 설치 후에 build.gradle 파일을 열어 프로젝트를 동기화 합니다.

3. OpenCV JAVA API 사용하기

File > New > Import Module을 클릭해 모듈을 추가합니다. Source Directory에 <OpenCV Path>/sdk/java를 입력하면 모듈 이름을 자동으로 감지합니다.

다음으로, OpenCVLibrary310/build.gradle 파일을 열어 compileSdkVersion과 buildToolsVersion을 app/build.gradle 파일과 동일하게 맞춥니다. minSdkVersion도 21로 조정합니다. 최종적으로 수정된 제 build.gradle 파일은 다음과 같으며, 사용하는 안드로이드 컴파일 SDK 버전에 따라 수치가 다를 수 있습니다. 수정 후 gradle 파일 sync 버튼을 눌러 빌드가 되는지를 확인합니다.

apply plugin: 'com.android.library'

android {
    compileSdkVersion 24
    buildToolsVersion "24.0.2"

    defaultConfig {
        minSdkVersion 21
        targetSdkVersion 21
    }

    buildTypes {
        release {
            minifyEnabled false
            proguardFiles getDefaultProguardFile('proguard-android.txt'), 'proguard-rules.txt'
        }
    }
}

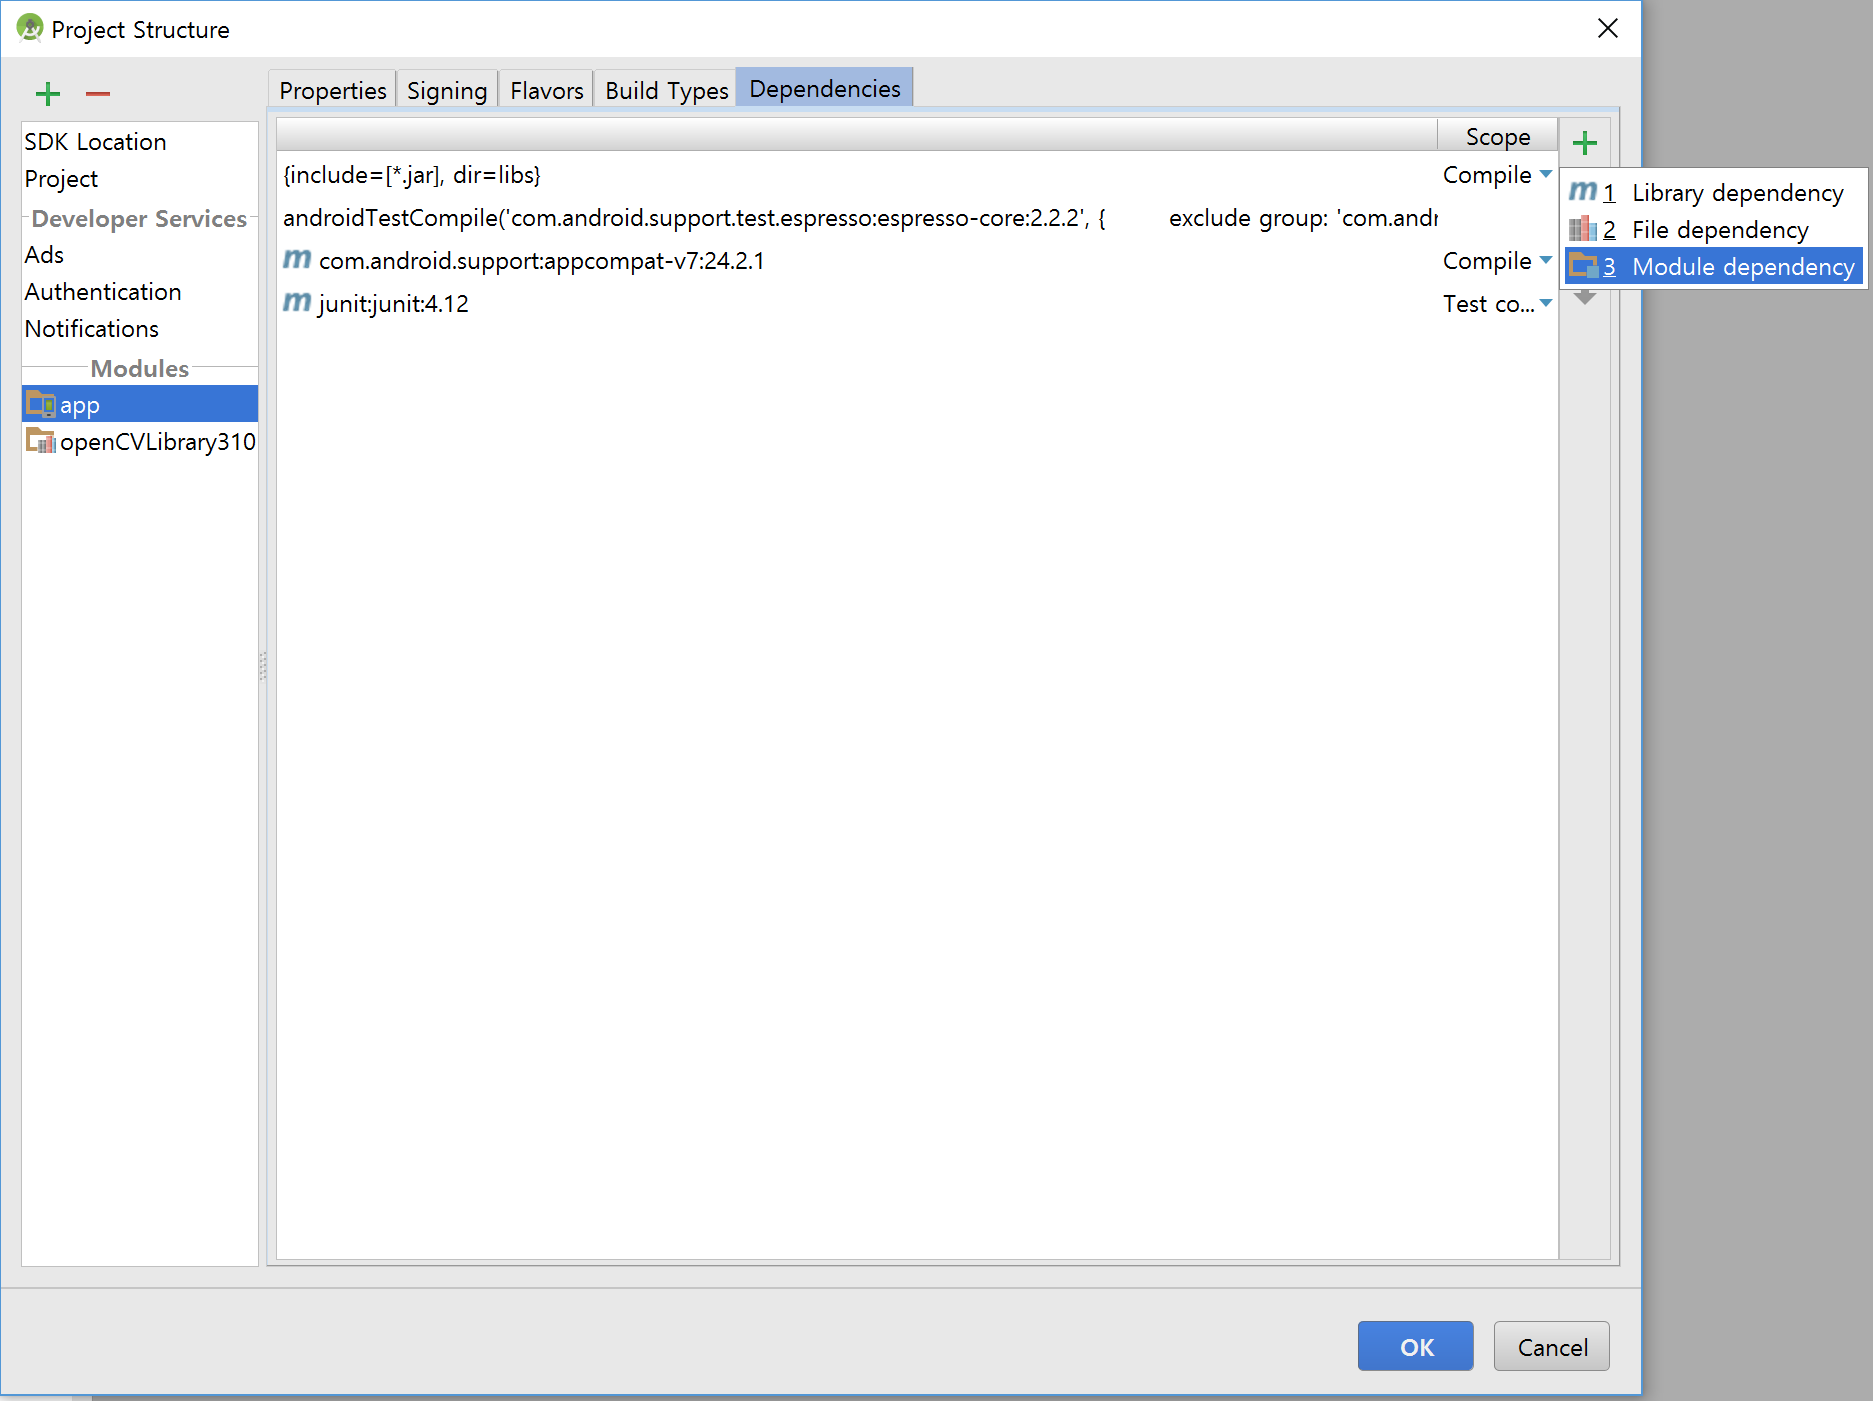
다음으로는 모듈 사이의 의존성을 설정해 주어야 합니다. 프로젝트 탐색기에서 프로젝트 폴더를 우클릭하고, Open Module Settings를 클릭한 뒤, app 모듈을 선택하고 Module Dependency로 openCVLibrary310을 추가합니다.

마지막으로, JAVA API 로드가 성공적으로 되었는지를 확인하기 위해 다음 코드를 Main Activity에 추가합니다.

    private BaseLoaderCallback mLoaderCallback = new BaseLoaderCallback(this) {
        @Override
        public void onManagerConnected(int status) {
            switch (status) {
                case LoaderCallbackInterface.SUCCESS:
                {
                    Log.i("OpenCV", "OpenCV loaded successfully");
                } break;
                default:
                {
                    super.onManagerConnected(status);
                } break;
            }
        }
    };

    @Override
    public void onResume()
    {
        super.onResume();
        OpenCVLoader.initAsync(OpenCVLoader.OPENCV_VERSION_3_1_0, this, mLoaderCallback);
    }

빌드 후 디바이스에서 실행하려고 하면, OpenCV Manager가 설치되어 있지 않다는 메시지와 함께 구글 플레이 스토어로 이동 됩니다. 그대로 설치하면 되고, 에뮬레이터 등 플레이 스토어가 존재하지 않는 환경에서는 <OpenCV Path>/apk에서 CPU 아키텍처에 맞는 apk 파일을 이용해 설치할 수도 있습니다. 이렇게 사용하는 경우 OpenCV를 사용하는 애플리케이션끼리 라이브러리 하나를 서비스 형태로 공유해서 사용할 수 있으며, OpenCV 홈페이지에서 권장하고 있는 방법입니다.

OpenCV Manager 없이 애플리케이션을 standalone 형태로 배포하고 싶은 경우에는 <OpenCV Path>/sdk/native/libs에 있는 라이브러리 파일을 사용해야 하며 여기서는 다루지 않겠습니다. OpenCV 3.1 튜토리얼Static Initialization 부분을 참고하시면 됩니다.

여기까지 완료하셨다면 빌드 후 디바이스에 설치한 뒤, Android Monitor 기능을 이용해 성공적으로 OpenCV API를 호출하는 것을 확인할 수 있습니다.

4. OpenCV JNI로 사용하기

OpenCV의 JAVA API에도 유용한 기능이 많지만, 퍼포먼스가 C++ Native Code보다 떨어지고 지원하는 기능이 적습니다. 이 때 JNI를 이용하면 기존의 C++ OpenCV API를 안드로이드 자바 코드에서 호출해 사용할 수 있습니다.

기존 튜토리얼 대다수가 안드로이드 스튜디오 하위 버전을 기준으로 작성되었고, Deprecated된 기능을 사용하고 있어 JNI 빌드 부분에서 고생을 했습니다. 구글의 안드로이드 스튜디오 가이드가 큰 도움이 되었습니다.

프로젝트를 생성할 때 C++ 지원을 활성화 하셨다면 CMakeLists.txt와 함께 native-lib.cpp 파일이 생성되셨을 겁니다. CMakeLists.txt에 다음 내용을 추가합니다. OpenCV Path는 자신의 설치 경로로 바꿔주시기 바랍니다.

set(OpenCV_DIR <OpenCV Path>/sdk/native/jni)
find_package(OpenCV REQUIRED)

그리고 target_link_libraries의 마지막에 ${OpenCV_LIBS}를 추가합니다. IDE 동기화가 성공적으로 이루어지는지 확인합니다.

<?xml version="1.0" encoding="utf-8"?>
<RelativeLayout
    xmlns:android="http://schemas.android.com/apk/res/android"
    xmlns:app="http://schemas.android.com/apk/res-auto"
    xmlns:tools="http://schemas.android.com/tools"
    android:id="@+id/activity_main"
    android:layout_width="match_parent"
    android:layout_height="match_parent"
    android:paddingLeft="@dimen/activity_horizontal_margin"
    android:paddingRight="@dimen/activity_horizontal_margin"
    android:paddingTop="@dimen/activity_vertical_margin"
    android:paddingBottom="@dimen/activity_vertical_margin"
    tools:context="io.qwaz.androidopencv.MainActivity">

    <TextView
        android:id="@+id/sample_text"
        android:layout_width="wrap_content"
        android:layout_height="wrap_content"
        android:text="Hello World!" />

    <ImageView
        android:layout_width="match_parent"
        android:layout_height="match_parent"
        app:srcCompat="@android:color/transparent"
        android:layout_below="@+id/sample_text"
        android:id="@+id/imageView"
        android:layout_alignParentStart="true"
        android:adjustViewBounds="false"
        android:cropToPadding="false"
        android:layout_marginTop="16dp" />
</RelativeLayout>
#include <jni.h>
#include <string>
#include <opencv2/opencv.hpp>

extern "C" {

JNIEXPORT jstring JNICALL
Java_io_qwaz_androidopencv_MainActivity_stringFromJNI(
        JNIEnv* env,
        jobject /* this */) {
    std::string hello = "Hello from C++";
    return env->NewStringUTF(hello.c_str());
}

JNIEXPORT void JNICALL
Java_io_qwaz_androidopencv_MainActivity_fillMatrixColor(
        JNIEnv* env,
        jobject,
        jlong addrMat,
        jint red,
        jint green,
        jint blue
) {
    using namespace cv;

    Mat &mat = *(Mat*)addrMat;
    mat = Scalar(red, green, blue);

    return;
}

}
package io.qwaz.androidopencv;

import android.graphics.Bitmap;
import android.support.v7.app.AppCompatActivity;
import android.os.Bundle;
import android.util.Log;
import android.widget.ImageView;
import android.widget.TextView;

import org.opencv.android.BaseLoaderCallback;
import org.opencv.android.LoaderCallbackInterface;
import org.opencv.android.OpenCVLoader;
import org.opencv.android.Utils;
import org.opencv.core.CvType;
import org.opencv.core.Mat;

public class MainActivity extends AppCompatActivity {

    @Override
    protected void onCreate(Bundle savedInstanceState) {
        super.onCreate(savedInstanceState);
        setContentView(R.layout.activity_main);

        // Example of a call to a native method
        TextView tv = (TextView) findViewById(R.id.sample_text);
        tv.setText(stringFromJNI());
    }

    private BaseLoaderCallback mLoaderCallback = new BaseLoaderCallback(this) {
        @Override
        public void onManagerConnected(int status) {
            switch (status) {
                case LoaderCallbackInterface.SUCCESS:
                {
                    Log.i("OpenCV", "OpenCV loaded successfully");
                    // OpenCV 초기화 이후 함수 호출
                    updateImageView();
                } break;
                default:
                {
                    super.onManagerConnected(status);
                } break;
            }
        }
    };

    @Override
    public void onResume()
    {
        super.onResume();
        OpenCVLoader.initAsync(OpenCVLoader.OPENCV_VERSION_3_1_0, this, mLoaderCallback);
    }

    private void updateImageView() {
        ImageView iv = (ImageView) findViewById(R.id.imageView);
        iv.getImageMatrix();

        Mat mat = Mat.zeros(iv.getHeight(), iv.getWidth(), CvType.CV_8UC3);
        fillMatrixColor(mat.getNativeObjAddr(), 200, 1, 80);

        Bitmap bmp = Bitmap.createBitmap(mat.cols(), mat.rows(), Bitmap.Config.ARGB_8888);
        Utils.matToBitmap(mat, bmp);

        iv.setImageBitmap(bmp);
    }

    /**
     * A native method that is implemented by the 'native-lib' native library,
     * which is packaged with this application.
     */
    public native String stringFromJNI();
    private native void fillMatrixColor(long addrMat, int red, int green, int blue);

    // Used to load the 'native-lib' library on application startup.
    static {
        System.loadLibrary("native-lib");
    }
}

screenshot_2016-10-16-16-48-29

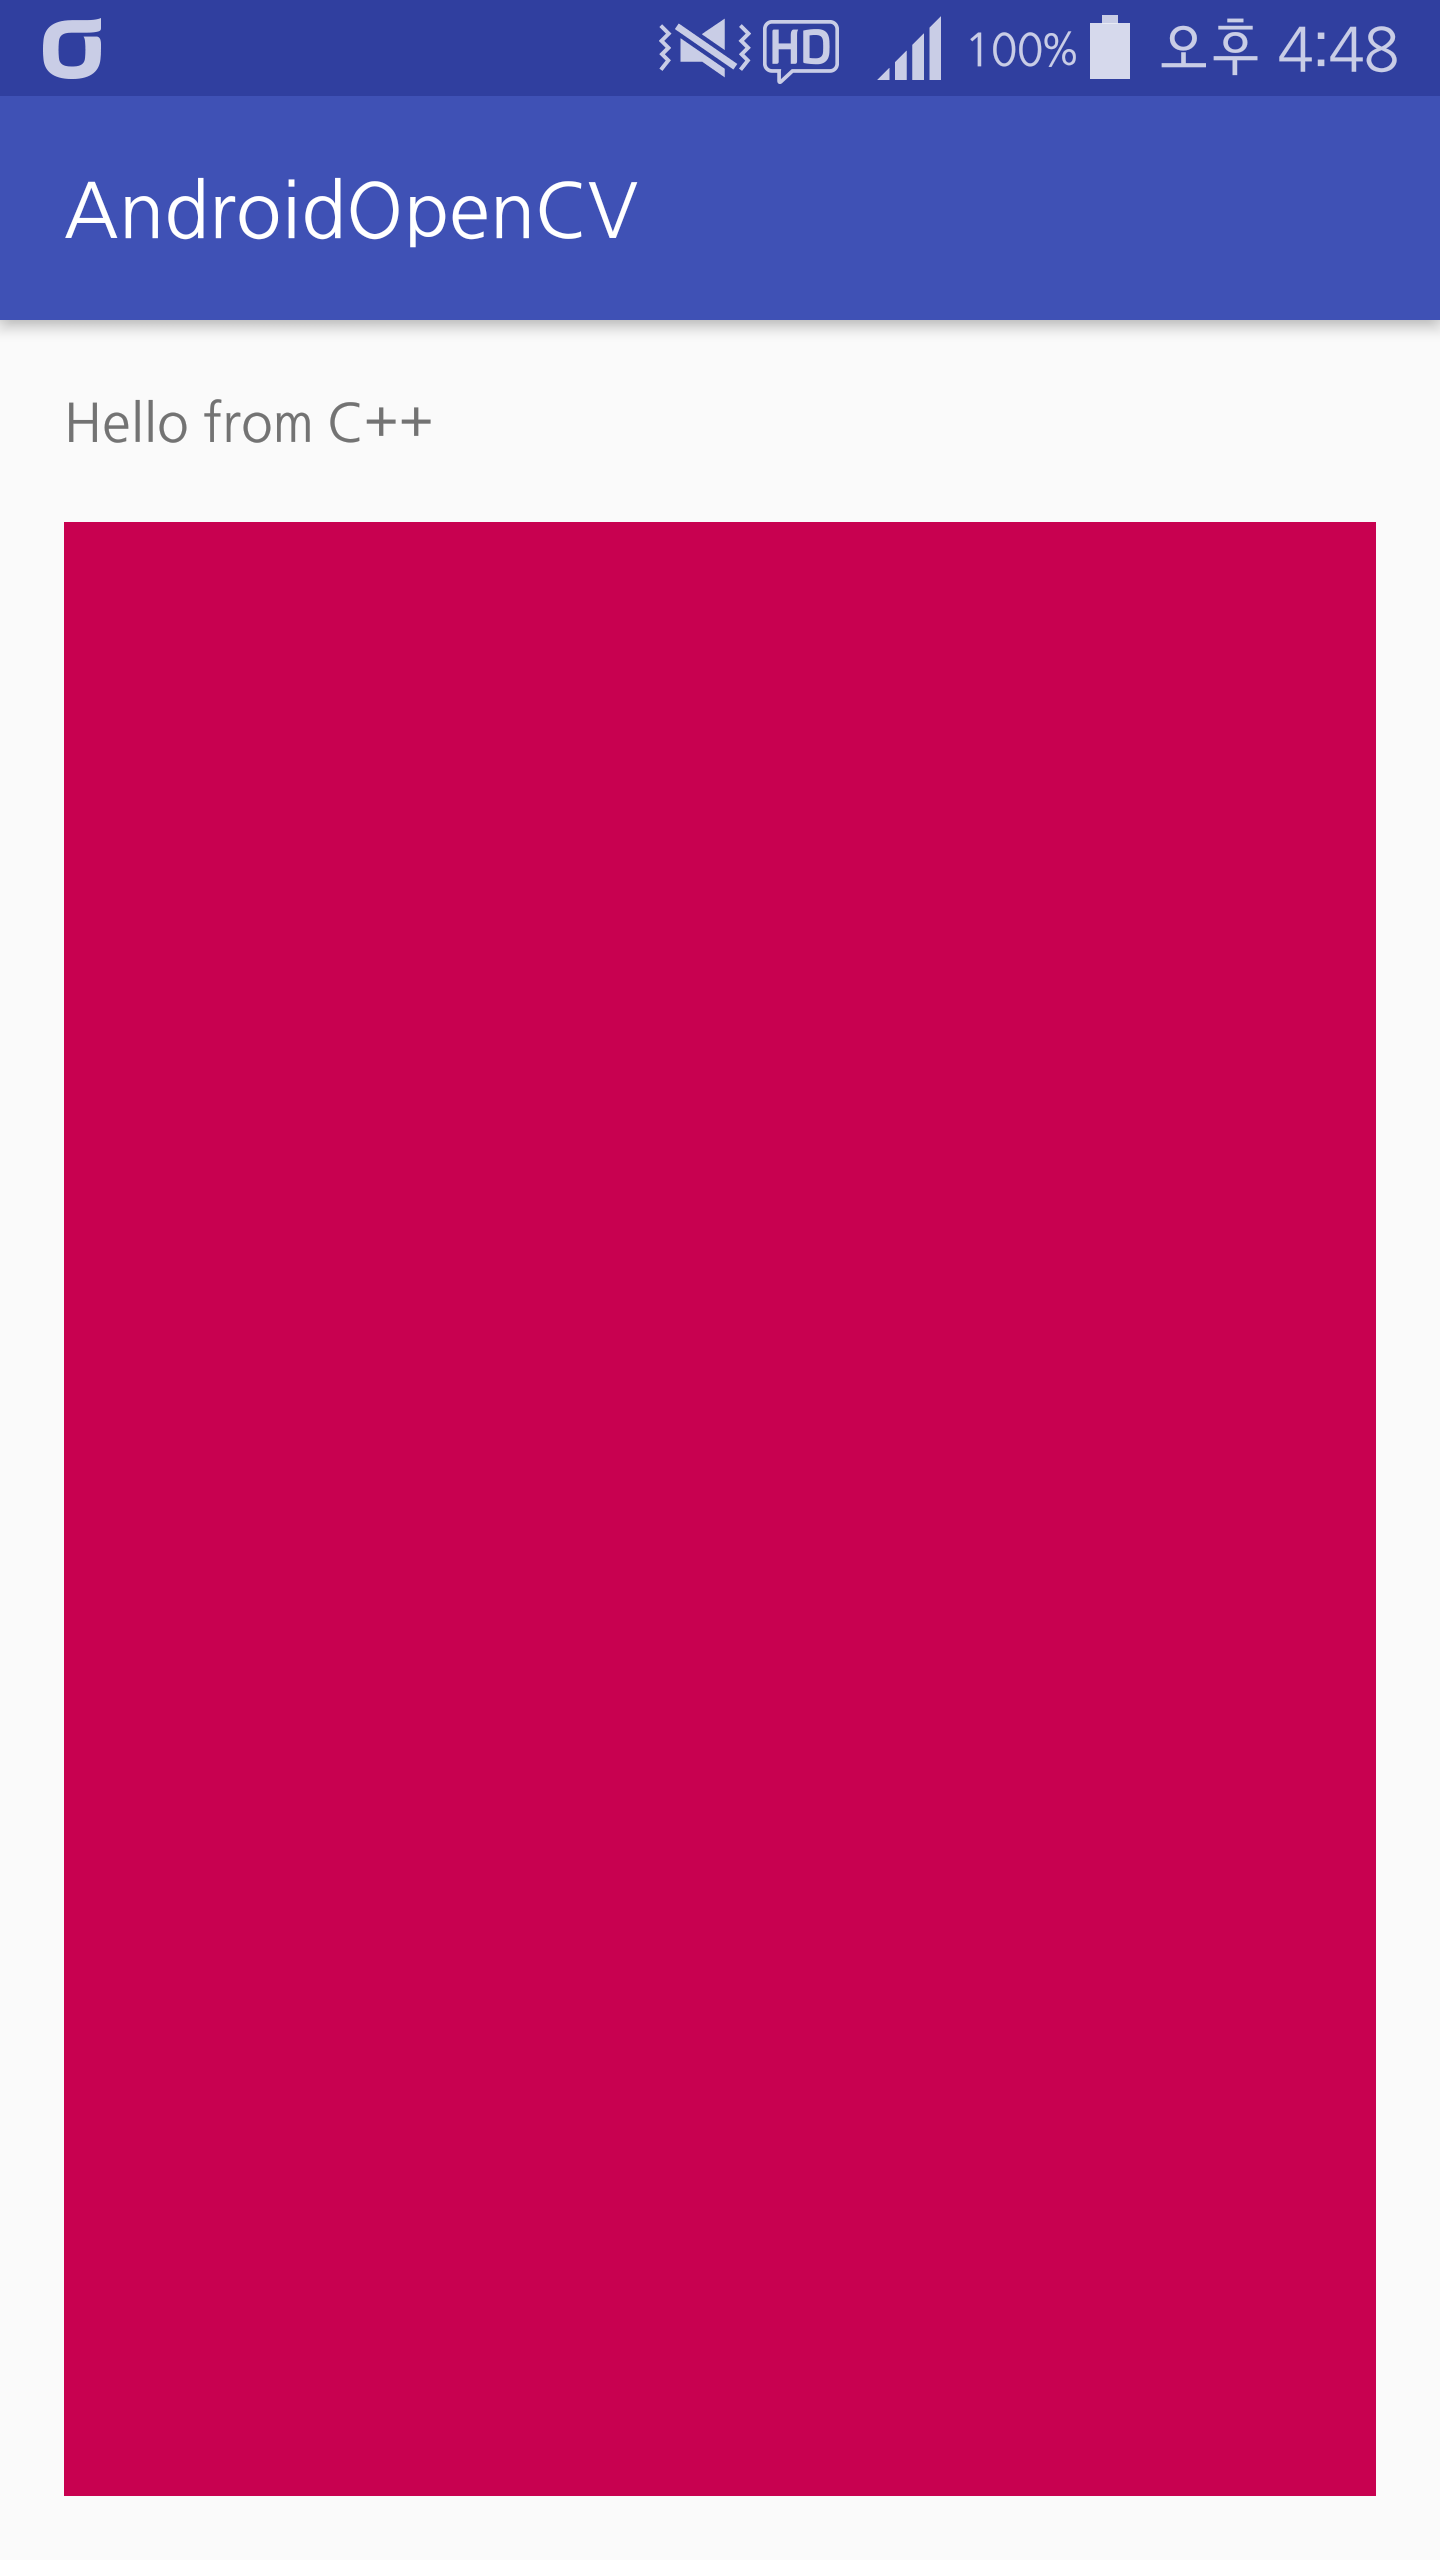
위와 같이 ImageView에 색깔이 입혀진 것을 확인할 수 있습니다.